My Craft Room

Hi all!  Today,  I am giving everyone a peak into my creative space.  My room is rather small, but it is all mine and I love it. 


The first photo is of my desk and stamping/coloring table.  I also keep my TV and DVD player on the table so I can watch while I am creating.  All of my stamp pads are stored in units from Stamp N Storage.  I have an Ott-Lite on my desk as well to help illuminate my stamped images when coloring.  I also have one of those white spinning carousels from Michaels to hold my most used tools, so I have them easily at hand.  My Copic markers, Spectrum Noir markers, and Distress Markers are stored in display cubbies that I bought when a local scrapbook store closed here in my home town. 


Last year I purchased a rotating display stand from a scrapbooking store that was replacing some of their old display units.  It had removable hooks that held embellishments.  I took those off and then drilled small holes all around the tiers with my cordless drill.  I then purchased several packs of the metal Clip-It-Up clips and hooked those into the holes I created.  This stand now holds all of my embellishments, stencils, Tim Holtz stamp sets, and Thickers.


 Against the wall to the right of my desk I have an Expedit unit that I got from IKEA. I collect pink and teal depression glass which is displayed on the top.  The items that are stored in each cubby are as follows (top left cubby to bottom right cubby): supplies for my colored pencils; Copic certification material/user manuals; Decorative "A" and other ephemera; Ribbons; Adhesives; newly bought items that need to be put away; 6x6 paper pads and misc. stamps in binders; stamps ( I use the method Jennifer McGuire uses to store my stamps); Stamping tools; more 6x6 paper pads and 8x8 paper pads; 6x6 paper pads and manila envelops for shipping; more stamps; mixed media supplies; items for altering; even more 6x6 paper pads (do you see and obsession here, lol!); cards I have made. 

 
I took the doors off my closet and put in storage for my paper.  The bottom two carts hold all my 12x12 patterned papers in Iris cases.  I have them labeled according to theme.  The top open unit colds all of my cardstock.  The pull out drawer holds my specialty papers, like my Copic Xpress It Blending Cardstock.  I also have storage for my washi tapes, my Cricut which I never use, and a Cropper Hopper for my scraps stored on the very top.  The wire rolling cart in the very front holds my embossing powders, paints, and other mixed media. 
 
 
To the left of my desk is my cutting table.  It houses my rotary cutter, Sizzix EClips 2, Vagabond, and my Silhouette Cameo.  Under the table I have another rolling cart where my stamp blocks and paper flowers are stored.  Above I have some magnetic die storage and embossing folder storage from Stamp N Storage, my IPod Dock/Radio and some small metal buckets with fibers.  Oh and that is my baby peaking out the window to the right.  Her name is Basil, and she insists on being wherever I am. 
 
 
Finally I created  storage for my bakers twine with pegboard and a frame.  I wish I could take credit for this idea, but I found it on Pinterest.  The twine is wrapped on 1 inch wooden spools.  I also have my Princess Crown Scentsy Pot, and a wood block display that changes with the seasons/holidays. 
 
I hope you enjoyed my room tour.  I know this was a long post, so thanks for sticking with me.  Head over to the Craft Hoarders Anonymous blog to see some of the other DT show off their creative spaces.  Also, there is a prize up for grabs over there.  Have a wonderful week!


June PollyCraft Review

Hi everyone,  I am sharing a quick project with you today as part of the June Pollycraft Review at C.C. Designs.  I used the new Nipper Stamp, and colored him up with my Copic markers.  Isn't he just the cutest?!  I also used the new CC Designs Cutters Baggie and Tag Die.  This die is so easy and fun for creating a pocket for a gift card or even a tag to tie onto a gift bag.  I hope you enjoy, and stop by the C.C. Designs store to nab the new collection up.

Inspired by Tattoo Art at the Craft-Room

This fortnight at the Craft-Room, Zoe is Challenging us to create a project inspired by tattoo art with a hand drawn element.  I had a hard time with this challenge, so I went to Pinterest for some inspiration.  Out of all the hundreds of tattoos I browsed through, the ones that stood out to me were the beautiful floral Designs.  Our Sponsor for this Challenge is Tando Creative.


I used a new Stamp Set from Power Poppy by Marcella Hawley called Peonies & Tulips.  I colored it with my Inktense pencils, water and a small round brush.  I wanted the colors to mimic the highly pigmented colors used in tattoo art.  The Inktense pencils were just the ticket.  They are highly pigmented pencils that mix with water, but are permanent when they dry.  The patterned paper is from Teresa Collins Stationary Noted.  The ribbon is from Really Reasonable Ribbon.  The oval doily is a Silhouette cut file.  As a final touch, I created a faux stitched background with my 0.3 Copic Multi-liner.  I hope you enjoy my inspiration, and join in the fun with this great challenge!

Stencil Girls/Craft Hoarders Anonymous Challenge Blog Hop


This week the Craft Hoarders Anonymous Challenge Blog is changing it up...with a blog hop! Challenge #10 is ready at the Craft Hoarders Anonymous Challenge Blog but we are doing things a bit differently this time! We are doing a week-long blog hop with STENCIL GIRL!

Each day this week you will visit the Craft Hoarders Anonymous Challenge Blog see the fabulous designs of the Craft Hoarders Anonymous Team, and then you will visit the Stencil Girl Talk Blog to see what their team is doing! For the blog hop order, see the end of the post.

Now, for the challenge!

Challenge #10 Spray It! Ink It! Paint It! Smear It! Emboss It!
Show us your inner mixed media diva! Use spray mists, inks, paints, modeling paste, embossing powder, pastels, chalk, and whatever messy media you can find! Let's dig into that hoard, pull out some of that "messy stuff," and use it up! There is a mess-maker hiding in all of you! Let her/him out to play!

Remember, you have two weeks to play in the new challenge! Challenge #10 closes June 29th at midnight PT. Link up your project here to Challenge #10.

One talented participant will receive this prize, donated by Stencil Girl and WorldWin Papers.


Stencil Girl stencils are made by artists for artists. Unique designs for people who LOVE stencils like we love stencils. Owned and operated by artist Mary Beth Shaw. Visit the Stencil Girls Website and Blog, Stencil Girl Talk

Visit the WorldWin Papers website, worldwinpapers.com for more information. To locate a WorldWin retailer near you, call 1-888-843-6455 or email worldwin@worldwinpapers.com. Visit the WorldWin Blog for more projects.

Here is my inspiration I created for the hop this week.

 
I used several products, including a stencil from Stencil Girl to create the background.  I used a thin weight Kraft paper from WorldWin Papers and crinkled it up to create texture on the background.  The picture in the frame is of my husband and I on our wedding day. For a list of the products I used check out the end of my post.


Blog Hop Order:

June 16
Craft Hoarders Anonymous Challenge Blog
Amber Milone- Your Here
Christy Butters
Stencil Girl Talk Blog
Janet Joehlin
Michael  Trent

June 17
Craft Hoarders Anonymous Challenge Blog
Debbie Seyer
Donna Idlet
Stencil Girl Talk Blog

June 18
Craft Hoarders Anonymous Challenge Blog
Ginny Nemchak
Glenda Brooks
StencilGirl Talk Blog

June 19
Craft Hoarders Anonymous Challenge Blog
Gloria Stengel
Jan Marie Ennenga
Karen Zueger
StencilGirl Talk Blog

June 20
Craft Hoarders Anonymous Challenge Blog
Kathy Clement
Pam Bray
Tammi Bennett
StencilGirl Talk Blog
Kirsten Reed
 
Mixed Media: Gesso, Claudine Helmuth Studio Matte gel Medium; Viva Décor Modeling Cream in Pearl, Viva Décor Inka Gold in Antique Silver, Lindy's Stamp Gang (Nantucket Pearls Collection), Heart Striped Stencil by Stencil Girl; thin Kraft paper by Worldwin Papers
Accents: Shabby Chic Frame by Prima, I am Roses Flowers, Fatback Pearls from Stash, Lace ribbon; paper doilies, resin bird from The Paper Studio; Rose Ribbon from Tim Holtz; Seam Binding from Really Reasonable Ribbon

CCD June Review

Hi everyone!  I have a cute card to share with you today for the CC Designs June Review.  This little cutie is Vintage Beach Lucy, and she is currently available in the CC Designs store.  I colored her up with my Copic markers.  The sentiment is from AmyR's Beach Sentiments  The paper I used is the new line from Carta Bella called Ahoy There.  The ribbon is from Really Reasonable Ribbon's June ribbon kit.  The twine and sequins are from Pretty Pink Posh.  The button is from my stash.  I hope you enjoy and have a wonderful rest of your week!

Sun, Sand and Surf

Hi everyone!  I am hosting the latest challenge over at the Craft Room.  I chose Sun, Sand and Surf for a theme.  I thought it would be a great theme to kick off summer!  I used the new Lawn Fawn stamp set called Life is Good.  I also used their Spring Showers die set.  I created the background panel with Broken China, Salty Ocean, and Chipped Sapphire Distress ink.  I colored all the images with Copic markers and then fussy cut them out.  I finished off the sun, coconuts, and crab with my Wink of Stella Brush Pen.  I also added a coat of Glossy Accents to the crab.  I hope you enjoy it.  Head on over to the blog and join in the fun for your chance to win a great prize from our Sponsor Crafty Individuals.

Folded project

Hi everyone!  It is time for a new challenge at Craft Hoarders Anonymous.  Our sponsors for June are Worldwin Papers and Stencil Girls.  They both have generously donated a prize pack for one lucky winner.


Gloria is challenging us to create a project with a unique folding technique.

Challenge #9 Fold It
Use some sort of "fun fold" on your project. You can make a fun fold card, a pop-up card, an explosion box, or other type of project that makes use of folded cardstock or paper. You can share some folding techniques that are perfect for scrapbook layouts or mixed media pieces. Create a mini album with a folded binding. Fold some ribbon to make pleats. De-hoard those supplies and show us your folds....paper folds that is!

Here is the card I created for the challenge inspiration.


I used my Silhouette Cameo to cut out a Tri-Fold card with Worldwin Cardstock.  The patterned paper panels were also cut with the Silhouette using the brand new Ahoy There collection from Carta Bella.  The stamped image is from CC Designs.  I colored her up along with the sea bottom base with my new Spectrum Noir Colored Pencils and Gamsol.  I added Ruby Red Perfect Pearls to her pearl headband and belt.  I added sparkle to her tail and bodice with Crystal Stickles.  The bubbled are finished off with Clear Wink of Stella followed by Glossy Accents.  I created the Sea background with Tim Holtz watercolor cardstock and Salty Ocean/Tumbled Glass Distress inks.  I water colored with them to create a washed background.  I then went back when it was dry and added water splashes to it.  The seaweed was cut with my Silhouette and Worldwin cardstock.  The back panel was stenciled with a Stencil Girl Stencil.  The sentiments are from Simon Says Stamp. 

I really like how it turned out, and I hope you do too.  Head on over to the blog to see all of the wonderful creations from the rest of the DT and join in the fun with your folded project!

CCD June Preview Day One!

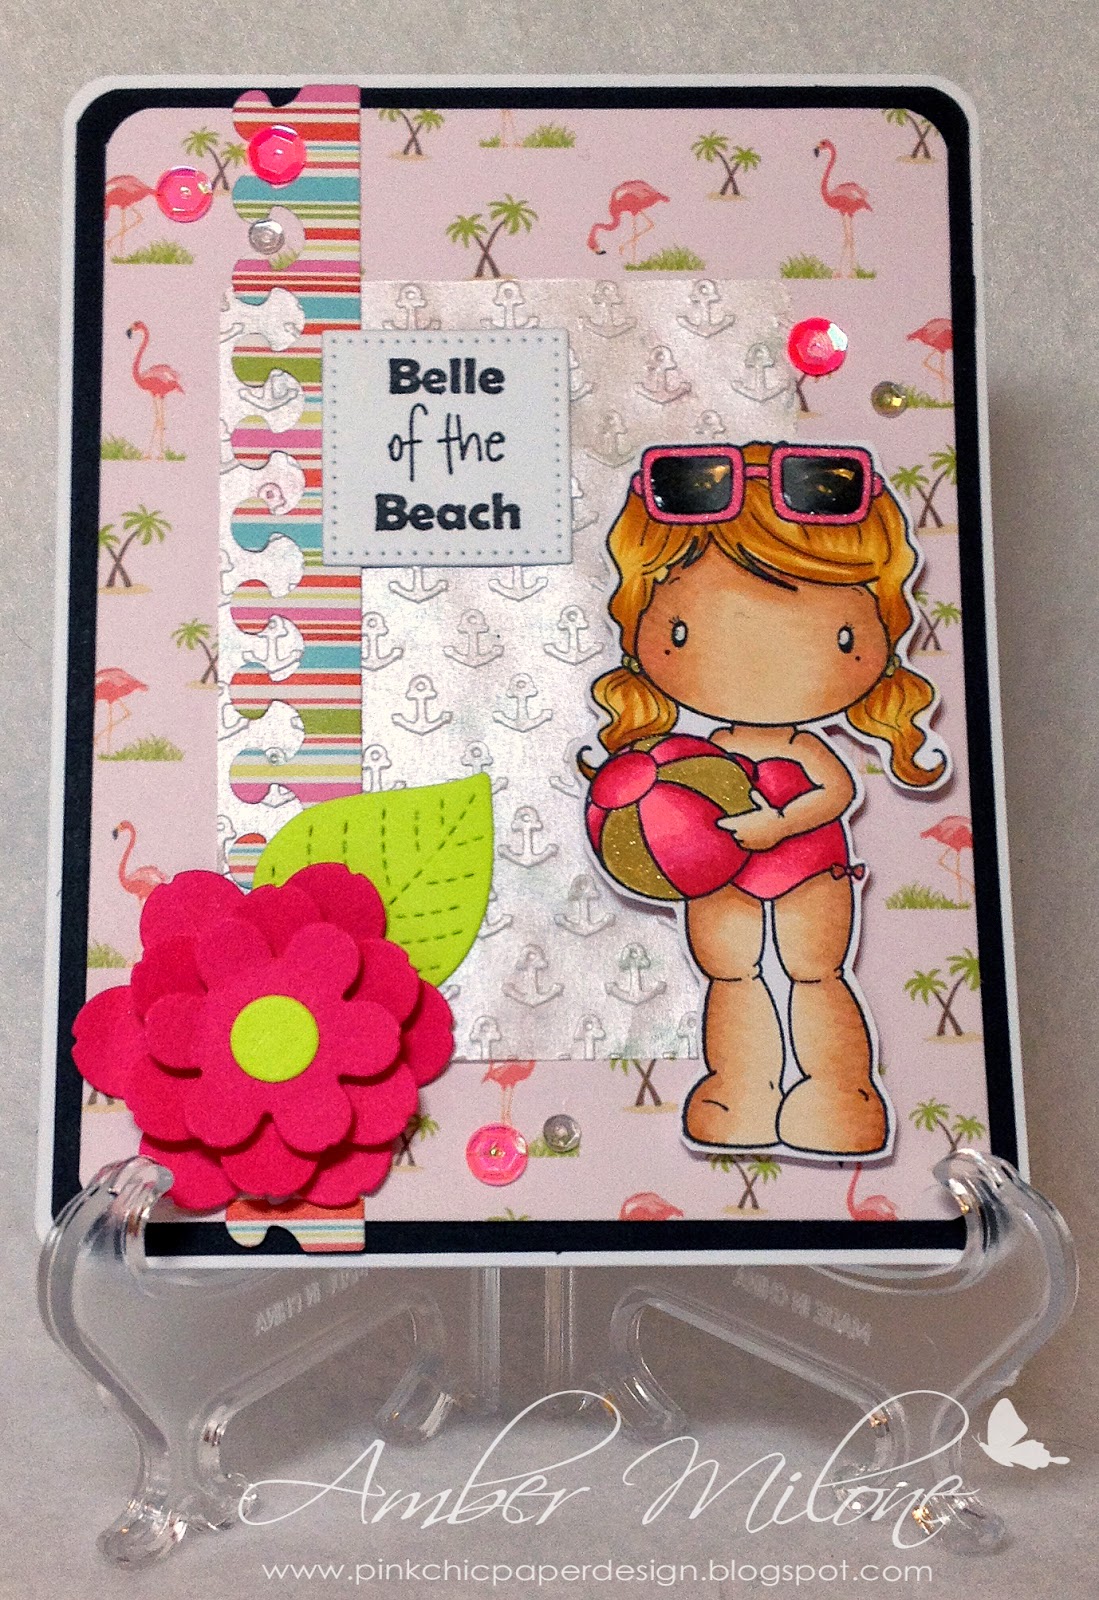
Hi every one!  I am back today to preview one of the new stamps that will be available next week in the CC Designs store.  Christine has cooked up some wonderful new images just in time for all your summer cards.  I am previewing Beach Ball Birgitta today.


I colored her up with my Copic Markers.  I added Glossy Accents to her sunglasses and gold Wink of Stella to her beach ball.  The patterned paper is Summer Lovin by Carta Bella.  I also used pearlescent velum and embossed it with a Lifestyle Crafts Anchor Embossing Folder.  I just LOVE this embossing folder, and snatched it up as soon as I saw it at the store.  The layout was created using the MFT Blueprints 5 die-namics.  I added a little bling with some sequins from my stash and rounded the corners with my corner chomper to finish it off.  I hope you enjoy my card.  Hop on over to the blog to see what the rest of the DT has created, and link up to win a prize!